Showing posts with label Magento 2. Show all posts

Thursday, 4 June 2020

HOW TO CREATE A CUSTOM THEME IN MAGENTO 2

Here Are The List Of Steps You Need To Follow For A Custom Theme Development:

  1. Create a directory for the theme

  2. Add a declaration for theme

  3. Add a composer.json file

  4. Add registration.php

  5. Create directories for CSS, JavaScript, images, and fonts

  6. Configure your theme in the Admin panel

  7. Final Deployment


Requirements For Theme Development

It is also very important to check whether your server meets the minimal Magento 2 requirements:

Apache: 2.2 or 2.4

PHP: 5.5.x or 5.6.x

MySQL: 5.6.x

Also, we assume that you have some knowledge of Magento 2 and Magento 2 is installed on your server as well as on your local computer to test this new theme development.


1. Create a directory for the theme

Go to: <your Magento 2 root directory>/app/design/frontend and create a new directory with the vendor name you want for theme package,

For example I have used name here : /app/design/frontend/Akshaweb 

Now in your vendor directory, create your theme directory, for example – Mytheme:

/app/design/frontend/Akshaweb/Mytheme/


2. Add a declaration for theme

Once you have created directory structure of your theme, now we have to declare that theme by creating theme.xml file to declare it.

theme.xml defines basic theme configuration, including at least the title and usually the parent theme that’s being extended.

Create the theme.xml file under app/design/frontend/Akshaweb/Mytheme/theme.xml and use the code below:

<theme xmlns:xsi="http://www.w3.org/2001/XMLSchema-instance" xsi:noNamespaceSchemaLocation="urn:magento:framework:Config/etc/theme.xsd">
  <title>Mytheme</title>
  <parent>Magento/Luma</parent>
  <media>
     <preview_image>media/mytheme-theme-image.jpg</preview_image>
  </media>
</theme>

3. Add a composer.json file

To distribute your theme as a package, add a composer.json file to the theme directory and register the package on a packaging server. 

app/design/frontend/Akshaweb/Mytheme/composer.json to register the package on a packaging server. This file is provided in the theme dependency information.


{
    "name": "Akshaweb/Mytheme",
    "description": "N/A",
    "require": {
        "php": "~5.5.0|~5.6.0|~7.0.0",
        "Akshaweb/Mytheme": "100.0.*",
        "magento/framework": "100.0.*"
    },
    "type": "magento2-theme",
    "version": "100.0.1",
    "license": [
        "OSL-3.0",
        "AFL-3.0"
    ],
    "autoload": {
        "files": [
            "registration.php"
        ]
    }
}

4. Add registration.php

To register your theme in the Magento system, you need to create registration.php file in your theme directory: app/design/frontend/Akshaweb/Mytgeme/registration.php and use the following code in your registration.php:

Code:

<?php
use Magento\Framework\Component\ComponentRegistrar;
ComponentRegistrar::register(
ComponentRegistrar::THEME,
'frontend/<Akshaweb>/<Mytheme>',
 __DIR__
);

5. Create directories for CSS, JavaScript, images, and fonts

Theme package consists of many types of files: styles, fonts, JavaScript and images. Each one have to be stored in its own sub-directory of web in theme directory:


Tip:

In Magento 2, theme or extension development, when you update any files in app/design/frontend/Akshaweb/Mytheme/web folder, you have two static folders which are located at pub/static and var/view_preprocessed. You will need to compile and recreate static files, otherwise, you will see there is still no change in frontend.


Directory Structure in Magento 2 Theme Development

At this point you can see how your theme directory should look like. I am using my own Vendor and directory name.


app/design/frontend/Mycompany/


├── default/
│   ├── etc/
│   │   ├── view.xml
│   ├── web/
│   │   ├── images/
│   │   │   ├── logo.svg
│   │   ├── css/
│   │   │   ├── source/
│   │   │   │   ├── _theme.less
│   │   ├── fonts/
│   │   ├── js/
│   ├── registration.php
│   ├── theme.xml
│   ├── composer.json

6. Configure your theme in the Admin panel


Step 1:  Go to Magento 2 backend, then go to Content > Design > Themes. And make sure your theme appears on this list.

Step 2:  Go to  Store => Configuration => Design => Choose your newly created theme from those shown in the image below.

Step 3:  Select Mytheme from the Applied Theme drop down menu and click on Save Configuration.

After you select your theme, click on the “Save Config” button.

Clear the cache.


7. Final Deployment

Open the SSH terminal and go to the root directory of your Magento 2. Now run all these commands one by one:


rm -rf var/di/* var/generation/* var/cache/* var/log/* var/page_cache/* var/session/* var/view_preprocessed/* pub/static/*
php bin/magento setup:upgrade
php bin/magento setup:db-schema:upgrade
php bin/magento setup:di:compile
php bin/magento setup:static-content:deploy
php bin/magento indexer:reindex
php bin/magento cache:clean
php bin/magento cache:flush 
Magento2 get cart and checkout link in block or phtml

Magento2 get cart and checkout link in block or phtml

In Magento2 get cart and checkout link in block or phtml then you need to call getUrl() method.It is every easy to get those url at Phtml or block class.

Also, there is no need to write layout xml code for getting cart and checkout page url at magento 2.

If want to get cart & checkout link at PHTML file then try below code:

Checkout Url

<?php echo $block->getUrl('checkout', ['_secure' => true]);?>

Cart Url

<?php echo $block->getUrl('checkout/cart', ['_secure' => true]);?>


If you want to call at block class try with

Checkout link:

$this->getUrl('checkout', ['_secure' => true]);


and Cart link:

$this->getUrl('checkout/cart', ['_secure' => true]);

I hope this will help lots.


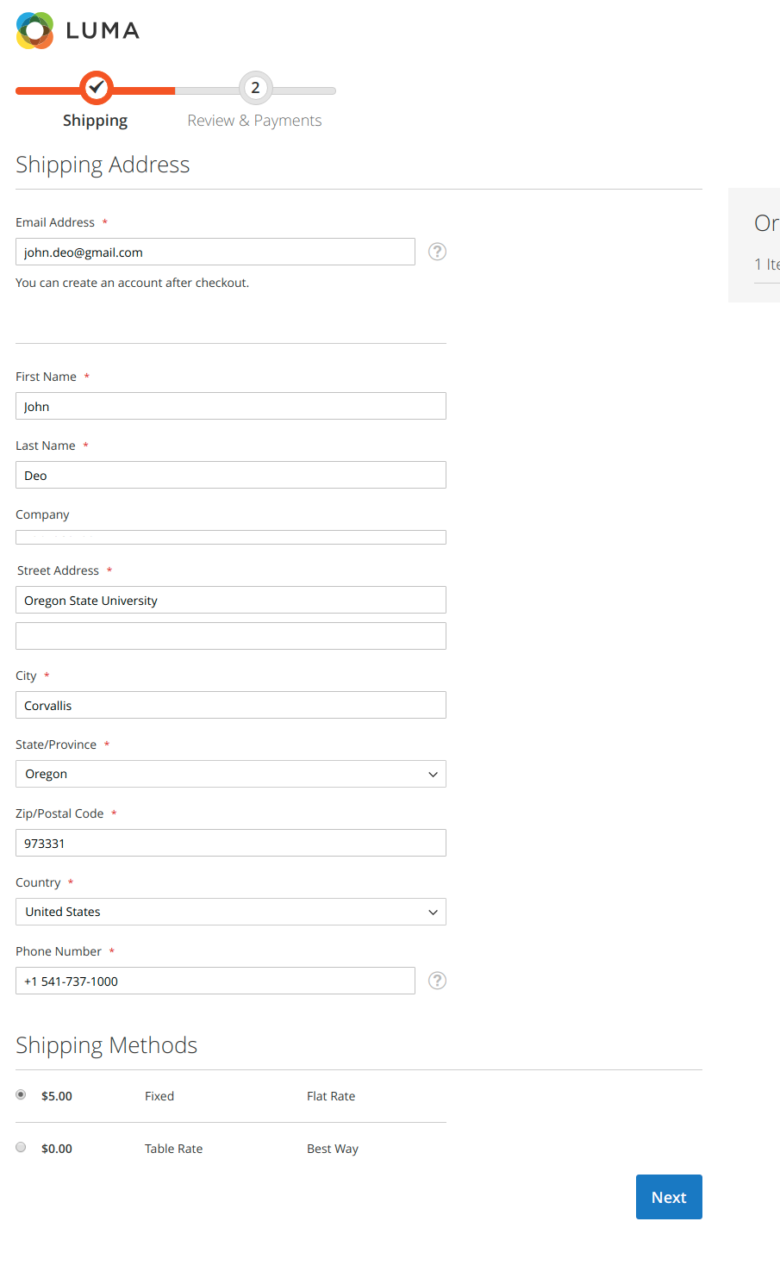
Magento2 Checkout shipping address autofill

Magento2 Checkout shipping address autofill

Magento2 Checkout shipping address autofill.

If you want to Magento2 Checkout shipping address autofill during checkout then you have to use Magento 2 plugin.

I have used plugin over on Class below classes for autofill checkout Shipping address:

Magento\Checkout\Block\Checkout\AttributeMerger::merge
Magento\Checkout\Model\DefaultConfigProvider::getConfig

Magento\Checkout\Block\Checkout\AttributeMerger is  main classis the main class where i able to auto fill firstname,lastname,street,city,postcode,country_id,region,region_id,telephone,companyabove fields value using after

Create after Plugin (Devbera\AutofillCheckoutAddress\Plugin\Magento\Checkout::afterMerge ) on Magento\Checkout\Block\Checkout\AttributeMerger::merge for shipping address fields autofill up.

Step1:Define Plugin classes:

First Create di.xml at app/code/{VendorName}/{ModuleName}/etc/frontent where we are define the plugin classes.

Code

<?xml version="1.0" ?>
<config xmlns:xsi="http://www.w3.org/2001/XMLSchema-instance" xsi:noNamespaceSchemaLocation="urn:magento:framework:ObjectManager/etc/config.xsd">
    <type name="Magento\Checkout\Block\Checkout\AttributeMerger">
        <plugin disabled="false" name="checking_shipping_address_auto_full"
                sortOrder="10" type="{VendorName}\{ModuleName}\Plugin\Magento\Checkout\AttributeMergerPlugin"/>
    </type>
    <type name="Magento\Checkout\Model\DefaultConfigProvider">
        <plugin disabled="false" name="checking_email_auto_full" sortOrder="10"
                type="{VendorName}\{ModuleName}\Plugin\Magento\Checkout\Model\DefaultConfigProviderPlugin"/>
    </type>
</config>

Step2: Declare plugin class

Create First plugin class AttributeMergerPlugin.php at app/code/{VendorName}/{ModuleName}/Plugin/Magento/Checkout/

Code

<?php
/**
 * @category   Devbera
 * @package    Devbera_AutofillCheckoutAddress
 * @author     Amit Bera <dev.amitbera@gmail.com>
 * @website    http://www.amitbera.com
 * @license    http://opensource.org/licenses/osl-3.0.php  Open Software License (OSL 3.0)
 */

namespace {VendorName}\{ModuleName}\Plugin\Magento\Checkout;

class AttributeMergerPlugin
{
    /**
     * @var \Psr\Log\LoggerInterface
     */
    private $logger;

    public function __construct(
        \Psr\Log\LoggerInterface $logger
    ) {
        $this->logger = $logger;
    }

    public function afterMerge(
        \Magento\Checkout\Block\Checkout\AttributeMerger $subject,
        $fields
    ) {
        $this->logger->info(__METHOD__);
        
        $fieldNames = $this->shippingAddressFieldAnAutoFillValues();

        foreach ($fields as $attributeCode => $field) {
            //$this->logger->info(print_r($field, true));
            if (in_array($attributeCode, $fieldNames)) {
                //  Different Code for set Value for Street
                if ($attributeCode == 'street' &&
                    isset($field['children'][0]['config']['customScope'])
                    && $field['children'][0]['config']['customScope'] == 'shippingAddress') {
                    $fields[$attributeCode]['children'][0]['value'] = 'Oregon State University';
                }
                // Checking Address Type Shipping and Attribute is not Street
                if ($attributeCode != 'street' &&
                    (isset($field['config']['customScope']) && ($field['config']['customScope'] == 'shippingAddress'))) {
                    
                     $this->logger->info($attributeCode);
                    switch ($attributeCode) {
                        case "firstname":
                            $fields[$attributeCode]['value'] = 'John';
                            break;
                        case "lastname":
                            $fields[$attributeCode]['value'] = 'Deo';
                            break;
                        case "city":
                            $fields[$attributeCode]['value'] = 'Corvallis';
                            break;
                        case "country_id":
                            $fields[$attributeCode]['value'] = 'US';
                            break;
                        case "region_id":
                            $fields[$attributeCode]['value'] = 49;
                            break;
                        case "telephone":
                            $fields[$attributeCode]['value'] = '+1 541-737-1000';
                            break;
                        case "company":
                            $fields[$attributeCode]['value'] = 'Public school';
                            break;
                        case "postcode":
                            $fields[$attributeCode]['value'] = '973331';
                            break;
                        case "region":
                            $fields[$attributeCode]['value'] = 'Oregon';
                            break;
                        default:
                           // echo "ELSE";
                    }
                }
            }
        }
        return $fields;
    }

    /**
     * Makeing an array of
     * @return array
     */
    private function shippingAddressFieldAnAutoFillValues()
    {
        return [
            'firstname',
            'lastname',
            'city' ,
            'postcode',
            'country_id',
            'region',
            'region_id' ,
            'telephone',
            'street',
            'company'
        ];
    }
 
}

Second plugin class which will auto fill email id for NON _login customer

Create seocnf plugin class DefaultConfigProviderPlugin.php at app/code/{VendorName}/{ModuleName}/Plugin/Magento/Checkout/Modelt/

<?php
/**
 * @category   Devbera
 * @package    Devbera_AutofillCheckoutAddress
 * @author     Amit Bera <dev.amitbera@gmail.com>
 * @website    http://www.amitbera.com
 * @license    http://opensource.org/licenses/osl-3.0.php  Open Software License (OSL 3.0)
 */

namespace {VendorName}\{ModuleName}\Plugin\Magento\Checkout\Model;

use Magento\Framework\App\Http\Context as HttpContext;
use Magento\Customer\Model\Context as CustomerContext;

class DefaultConfigProviderPlugin
{
    /**
     * @var HttpContext
     */
    private $httpContext;

    public function __construct(
        HttpContext $httpContext
    ) {
        $this->httpContext = $httpContext;
    }

    public function afterGetConfig(
        \Magento\Checkout\Model\DefaultConfigProvider $subject,
        $result
    ) {
        if (!$this->isCustomerLoggedIn() && is_array($result)) {
            $result['validatedEmailValue'] = 'john.deo@gmail.com';
        }
        return $result;
    }
    /**
     * Check if customer is logged in
     *
     * @return bool
     * @codeCoverageIgnore
     */
    private function isCustomerLoggedIn()
    {
        return (bool)$this->httpContext->getValue(CustomerContext::CONTEXT_AUTH);
    }
}

Disabled Autofill fields

If you want to disallow this autofill fields from editable for the customer then you have to add below code

$fields[$attributecode]['disabled'] = true; 

after autofill value set like you want disable first name field disable for customer after auto fill then add below code:

case "firstname":
    $fields[$attributeCode]['value'] = 'John';
    // Disable first  name field 
    $fields[$attributecode]['disabled'] = true; 		
    break;
case "lastname":
    $fields[$attributeCode]['value'] = 'Deo';
    break

Autofills Street field

Here, you may be seen that I have used different condition for the street because of this field is multiline code field. By default Magento street field is two lines, then you can use below code

 $fields[$attributecode]['children'][1]['value'] = 'Mayer road';

Here , at associated array value is 1 ( [‘children’][1]) as its line no is 2.


Thursday, 5 December 2019

Adding a new step to checkout page


Step 1: Create the .js file implementing the view model.

Create the checkout-login-step.js file under Akshweb/HelloWorld/view/frontend/web/js/view directory.
Basically, we need step_codestep_titleorder and the condition that allows to display this step.

Here is the code (Read code comment to get more info)

define(
    [
        'ko',
        'uiComponent',
        'underscore',
        'Magento_Checkout/js/model/step-navigator',
        'Magento_Customer/js/model/customer'
    ],
    function (
        ko,
        Component,
        _,
        stepNavigator,
        customer
    ) {
        'use strict';
        /**
        * check-login - is the name of the component's .html template
        */
        return Component.extend({
            defaults: {
                template: 'Akshaweb_HelloWorld/check-login'
            },

            //add here your logic to display step,
            isVisible: ko.observable(true),
            isLogedIn: customer.isLoggedIn(),
            //step code will be used as step content id in the component template
            stepCode: 'isLogedCheck',
            //step title value
            stepTitle: 'Logging Status',

            /**
            *
            * @returns {*}
            */
            initialize: function () {
                this._super();
                // register your step
                stepNavigator.registerStep(
                    this.stepCode,
                    //step alias
                    null,
                    this.stepTitle,
                    //observable property with logic when display step or hide step
                    this.isVisible,

                    _.bind(this.navigate, this),

                    /**
                    * sort order value
                    * 'sort order value' < 10: step displays before shipping step;
                    * 10 < 'sort order value' < 20 : step displays between shipping and payment step
                    * 'sort order value' > 20 : step displays after payment step
                    */
                    15
                );

                return this;
            },

            /**
            * The navigate() method is responsible for navigation between checkout step
            * during checkout. You can add custom logic, for example some conditions
            * for switching to your custom step
            */
            navigate: function () {

            },

            /**
            * @returns void
            */
            navigateToNextStep: function () {
                stepNavigator.next();
            }
        });
    }
);

Step 2: Create an .html template for the component.

In the above step, we use Akshaweb_HelloWorld/check-login as our template, let’s create it.

Create a new html file named check-login.html under Akshaweb/HelloWorld/view/frontend/web/template directory.

Here is the code

<!--Use 'stepCode' as id attribute-->
<li data-bind="fadeVisible: isVisible, attr: { id: stepCode }">
<div class="step-title" data-bind="i18n: stepTitle" data-role="title"></div>
    <div id="checkout-step-title"
         class="step-content"
         data-role="content">
         <p>The customer is <span data-bind="if: !isLogedIn">not</span> Logged-in</p>
        <form data-bind="submit: navigateToNextStep" novalidate="novalidate">
            <div class="actions-toolbar">
                <div class="primary">
                    <button data-role="opc-continue" type="submit" class="button action continue primary">
                        <span><!-- ko i18n: 'Next'--><!-- /ko --></span>
                    </button>
                </div>
            </div>
        </form>
    </div>
</li>

Step 3: Add the new step to the Checkout page layout.

We need to extend the checkout page’s layout to be able to display the new step
Add this file in our module:

Akshaweb/HelloWorld/view/frontend/layout/checkout_index_index.xml

The content as follow:

<page xmlns:xsi="http://www.w3.org/2001/XMLSchema-instance" layout="1column" xsi:noNamespaceSchemaLocation="urn:magento:framework:View/Layout/etc/page_configuration.xsd">
    <body>
        <referenceBlock name="checkout.root">
                <arguments>
                    <argument name="jsLayout" xsi:type="array">
                        <item name="components" xsi:type="array">
                            <item name="checkout" xsi:type="array">
                                <item name="children" xsi:type="array">
                                    <item name="steps" xsi:type="array">
                                        <item name="children" xsi:type="array">
                                            <!-- The new step you add -->
                                            <item name="check-login-step" xsi:type="array">
                                                <item name="component" xsi:type="string">Akshaweb_HelloWorld/js/view/checkout-login-step</item>
                                                    <!--To display step content before shipping step "sortOrder" value should be < 1-->
                                                    <!--To display step content between shipping step and payment step  1 < "sortOrder" < 2 -->
                                                    <!--To display step content after payment step "sortOrder" > 2 -->
                                                <item name="sortOrder" xsi:type="string">2</item>
                                                <item name="children" xsi:type="array">
                                                    <!--add here child component declaration for your step-->
                                                </item>
                                            </item>
                                        </item>
                                    </item>
                                </item>
                            </item>
                        </item>
                    </argument>
                </arguments>
        </referenceBlock>
    </body>
</page>

That’s the steps to add a new step to checkout page.
Clean cache and refresh your browser, the result will appear like this
check login step

Thursday, 11 April 2019

Magento2 programmatically create coupon

Magento2 programmatically create coupon

In this article, i have explaining how to we can create coupon programmatically.

At Magento 2, if you wish to create a coupon problematically .

Follow below steps:

  • First, you have to create a Cart Price rule/Shopping Cart rule.
  • At, Second steps you will create coupon code.

Advanced sales promotion rules like #free-gift, discount on #first-order, #nth-order, #total-sales-amount, #total-order-number #specific-customers #subscribers etc.http://bit.ly/M2-Sales-Promotion

1.Create Cart Price rules

For a create rules, i have used repository interface classes:

Magento\SalesRule\Api\RuleRepositoryInterface
Magento\SalesRule\Api\CouponRepositoryInterface

For set the data for rules repository class, we have use the interface

Magento\SalesRule\Api\Data\RuleInterface

This interface some setter methods using this setter method, using those method you can set discount percent/amount ,rules starting & ending date ,conditions of a rules.

Here an example code of Create Cart price rule

<?php

namespace DevAmitbera\CustomModule\Model;

use Magento\SalesRule\Api\Data\RuleInterface;
use Magento\SalesRule\Api\RuleRepositoryInterface;
use Magento\SalesRule\Model\CouponFactory;
use Magento\SalesRule\Model\RuleFactory;


class Test 
{

    /**
     * @var RuleInterface
     */
    private $rule;

    /**
     * @var RuleFactory
     */
    private $ruleFactory;

    /**
     * @var RuleRepositoryInterface
     */
    private $RuleRepository;

    public function __construct(
            RuleRepositoryInterface $RuleRepository,
            RuleFactory $ruleFactory,
            RuleInterface $rule
    ) {
        $this->RuleRepository = $RuleRepository;
        $this->ruleFactory = $ruleFactory;
        $this->rule = $rule;
    }


    public function createCartRules() {

        $rule =$this->rule;
        $rule->setName('5% discount') // Rules name
                ->setDescription('5% discount on all')
                ->setIsAdvanced(true)
                ->setStopRulesProcessing(false)
                ->setDiscountQty(5)
                ->setCustomerGroupIds([0, 1])
                ->setWebsiteIds([1])
                ->setUseAutoGeneration(0)    // If want to auto generate
                ->setCouponType(RuleInterface::COUPON_TYPE_SPECIFIC_COUPON)
                ->setSimpleAction(RuleInterface::DISCOUNT_ACTION_FIXED_AMOUNT_FOR_CART)
                ->setUsesPerCoupon(100)
                ->setUsesPerCustomer(2)
                ->setDiscountAmount(10)
                ->setFromDate('2019-04-01') //Format YYYY-MM-DD
                ->setToDate('2039-04-14') //Format YYYY-MM-DD
                ->setIsActive(true);

        try {
            $resultRules = $this->RuleRepository->save($rule);
        } catch (\Magento\Framework\Exception\LocalizedException $ex) {
            var_dump($ex->getMessage());
        }
    }

} 

Parameters of Setter methods

  • setName() Method used for set  Rule Name.
  • setDescription($description) used for set for rule Description
  • setIsActive() is used for Enabled disabled Rule.Its value is true or false
  • setCustomerGroupIds($customerGroupIds) Method used for  Customer Groups field value. Parameters type Shoule Array like [0, 1]. 
  • setWebsiteIds($websiteIds) used for set Websites field.$websiteIds Type means parameters type should be Array .LIke setWebsiteIds([1]).A single website ‘s website id is 1.
  • setCouponType($couponType), Using this method you can set Coupon type .$couponType Variable type integer and It value will be 1 (No Coupon) or 2 (Specific Coupon)
  • setUseAutoGeneration($useAutoGeneration) use for create auto generate coupon.Parameter type boolean means true or false   . 
  • setSimpleAction($simpleAction) it is use for set Coupon discount type means Value of  Apply field at Action tab.It value may be by_percent (i.e Percent of product price discount),by_fixed(i.e Fixed amount discount) oR cart_fixed(i.e Fixed amount discount for whole cart)Or buy_x_get_y(i.e Buy X get Y free (discount amount is Y))
  • setDiscountAmount($discountAmount) is use for set field Discount Amount value
  • setDiscountQty($discountQty) is use for set  Maximum Qty Discount is Applied To field value. It value will be an integer.
  • setSimpleFreeShipping($simpleFreeShipping) is use for set Free Shipping field .It value should be string and value will be 0 (I.e No),1 (I.e For matching items only),2 ( I.e For shipment with matching items)

See more details about the setter function interface Magento\SalesRule\Api\Data\RuleInterface

Create Coupon of the rule

After creating Cart Price rules, you may be want to the coupon code

Use below Class

Magento\SalesRule\Api\CouponRepositoryInterface:save

Data Provider interface : Magento\SalesRule\Api\Data\CouponInterface

/*
* $this->couponFactory \Magento\SalesRule\Model\CouponFactory
* @coupon \Magento\SalesRule\Api\Data\CouponInterface
*/
$coupon = $this->couponFactory->create();

$coupon->setCode($couponCode)
        ->setIsPrimary(true)
        ->setRuleId($rulesId());
$this->couponRepository->save($coupon);

Here note that setIsPrimary() parameters should be true /false means boolean

If you want to Coupon Code at Rule Information  Section

,then you have to make setIsPrimary(true) .

Code Sample for Create Single Coupon for a rule

<?php


namespace Stackexchange\Magento\Observer;

use Magento\SalesRule\Api\CouponRepositoryInterface;
use Magento\SalesRule\Api\Data\CouponInterface;
use Magento\SalesRule\Api\Data\RuleInterface;
use Magento\SalesRule\Api\RuleRepositoryInterface;
use Magento\SalesRule\Model\CouponFactory;
use Magento\SalesRule\Model\RuleFactory;
use Magento\Framework\Math\Random;
use Magento\SalesRule\Api\Data\CouponGenerationSpecInterfaceFactory;
use Magento\SalesRule\Model\Service\CouponManagementService;

class CreateCouponCustomer {

    /**
     * @var CouponGenerationSpecInterfaceFactory
     */
    private $generationSpecFactory;

    /**
     * @var CouponManagementService
     */
    private $couponManagementService;

    /**
     * @var Random
     */
    private $random;

    /**
     * @var CouponFactory
     */
    private $couponFactory;

    /**
     * @var RuleFactory
     */
    private $ruleFactory;

    /**
     * @var CouponRepositoryInterface
     */
    private $couponRepository;

    /**
     * @var RuleRepositoryInterface
     */
    private $RuleRepository;

    public function __construct(
      CouponRepositoryInterface $couponRepository,
      RuleRepositoryInterface $RuleRepository,
      CouponFactory $couponFactory,   
      RuleFactory $ruleFactory,
      Random $random,
     CouponGenerationSpecInterfaceFactory $generationSpecFactory,
     CouponManagementService $couponManagementService       
    ) {
        
        $this->RuleRepository = $RuleRepository;
        $this->couponRepository = $couponRepository;
        $this->ruleFactory = $ruleFactory;
        $this->couponFactory = $couponFactory;
        $this->random = $random;
        $this->couponManagementService = $couponManagementService;
        $this->generationSpecFactory = $generationSpecFactory;
    }
    public function execute(\Magento\Framework\Event\Observer $observer)
    {
        $customer = $observer->getEvent()->getCustomer();
        $rule =  $this->ruleFactory->create();
        $rule->setName('5% discount')
            ->setIsAdvanced(true)
            ->setStopRulesProcessing(false)
            ->setDiscountQty(10)
            ->setCustomerGroupIds([$customer->getGroupId()])
            ->setWebsiteIds([1])
            ->setCouponType(RuleInterface::COUPON_TYPE_SPECIFIC_COUPON)
            ->setSimpleAction(RuleInterface::DISCOUNT_ACTION_FIXED_AMOUNT_FOR_CART)
            ->setDiscountAmount(10)
            ->setIsActive(true);
        
        try{
            $resultRules = $this->RuleRepository->save($rule);
            $this->createCouponCode($resultRules);
        } catch (\Magento\Framework\Exception\LocalizedException $ex) {

        }
        
    }
    private function createCouponCode(RuleInterface $rule)
    {
        $couponCode = $this->random->getRandomString(8);
        $coupon = $this->couponFactory->create();
        $coupon->setCode($couponCode)
                ->setIsPrimary(1)
                ->setRuleId($rule->getRuleId());
        $this->couponRepository->save($coupon);
    }
}
 At the example, I have created a random coupon code by creating 8 lengths using Magento\Framework\Math\Random::getRandomString(8)

Create Auto generate multiple Coupon for a single rule

Want auto generate multiple Coupon codes, that you donot need to use below class

Magento\SalesRule\Api\CouponRepositoryInterface;
Magento\SalesRule\Api\Data\CouponInterface;

Used the classes:

  • Magento\SalesRule\Api\Data\CouponGenerationSpecInterfaceFactory;
  • Magento\SalesRule\Model\Service\CouponManagementService;

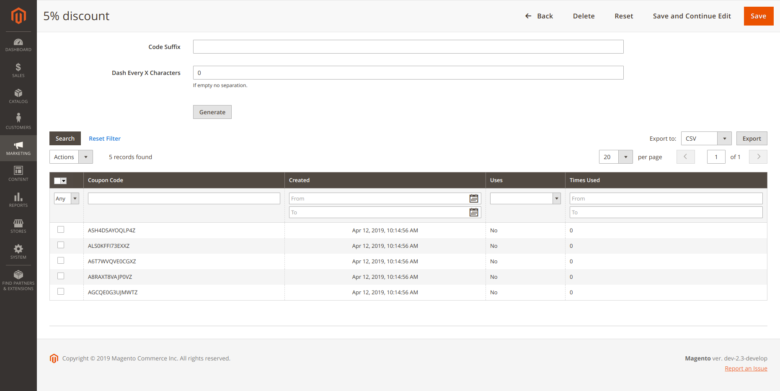
This is coupon does not show at Rule Information  

Auto generate Coupon

Section and it will show at Manage Coupon Codes section.

        $couponSpecData = [
            'rule_id' => $ruleId(),
            'qty' => 5, // How many coupon you want to create 
            'length' => 12, // Coupon length
            'format' => 'alphanum', // Alphanumeric = alphanum, Alphabetical = alpha ,
            'prefix' => 'A', // Can use Null 'prefix' =>  null,
            'suffix' => 'Z', // Can use Null 'prefix' =>  null,
            'dash' => 0, // Can use Null 'prefix' =>  null,
            'quantity' => 5 // How coupon you want to create 
        ];
        /**
         * @var $this->generationSpecFactory \Magento\SalesRule\Api\Data\CouponGenerationSpecInterfaceFactory
         * @var $this->couponManagementService \Magento\SalesRule\Model\Service\CouponManagementService
         */
        $couponSpec = $this->generationSpecFactory->create(['data' => $couponSpecData]);
        $this->couponManagementService->generate($couponSpec);

Here rule_id,Coupon Qty : qty,Code Length:length & quantity,Code Format: format are required fields

Simple Code for Auto generate coupon code

<?php

namespace StackExchange\Magento\Model;

use Magento\SalesRule\Api\CouponRepositoryInterface;
use Magento\SalesRule\Api\Data\CouponInterface;
use Magento\SalesRule\Api\Data\RuleInterface;
use Magento\SalesRule\Api\RuleRepositoryInterface;
use Magento\SalesRule\Model\CouponFactory;
use Magento\SalesRule\Model\RuleFactory;
use Magento\Framework\Math\Random;
use Magento\SalesRule\Api\Data\CouponGenerationSpecInterfaceFactory;
use Magento\SalesRule\Model\Service\CouponManagementService;

class AutoCoupon {

    /**
     * @var RuleInterface
     */
    private $rule;

    /**
     * @var CouponGenerationSpecInterfaceFactory
     */
    private $generationSpecFactory;

    /**
     * @var CouponManagementService
     */
    private $couponManagementService;

    /**
     * @var Random
     */
    private $random;

    /**
     * @var CouponFactory
     */
    private $couponFactory;

    /**
     * @var RuleFactory
     */
    private $ruleFactory;

    /**
     * @var CouponRepositoryInterface
     */
    private $couponRepository;

    /**
     * @var RuleRepositoryInterface
     */
    private $RuleRepository;

    public function __construct(
            CouponRepositoryInterface $couponRepository,
            RuleRepositoryInterface $RuleRepository,
            CouponFactory $couponFactory,
            RuleFactory $ruleFactory,
            RuleInterface $rule,
            Random $random,
            CouponGenerationSpecInterfaceFactory $generationSpecFactory,
            CouponManagementService $couponManagementService
    ) {
        $this->RuleRepository = $RuleRepository;
        $this->couponRepository = $couponRepository;
        $this->ruleFactory = $ruleFactory;
        $this->couponFactory = $couponFactory;
        $this->random = $random;
        $this->couponManagementService = $couponManagementService;
        $this->generationSpecFactory = $generationSpecFactory;
        $this->rule = $rule;
    }


    public function createCartRules() {

        $rule =$this->rule;
        $rule->setName('5% discount') // Rules name
                ->setDescription('5% discount on all')
                ->setIsAdvanced(true)
                ->setStopRulesProcessing(false)
                ->setDiscountQty(5)
                ->setCustomerGroupIds([0, 1])
                ->setWebsiteIds([1])
                ->setUseAutoGeneration(true)    // If want to auto generate
                ->setCouponType(RuleInterface::COUPON_TYPE_SPECIFIC_COUPON)
                ->setSimpleAction(RuleInterface::DISCOUNT_ACTION_FIXED_AMOUNT_FOR_CART)
                ->setUsesPerCoupon(100)
                ->setUsesPerCustomer(2)
             
                ->setDiscountAmount(10)
                ->setFromDate('2019-04-01') //Format YYYY-MM-DD
                ->setToDate('2039-04-14') //Format YYYY-MM-DD
                ->setIsActive(true);

        try {
            $resultRules = $this->RuleRepository->save($rule);
            $this->autoGenerateCouponOnSingleRules($resultRules);
        } catch (\Magento\Framework\Exception\LocalizedException $ex) {
            var_dump($ex->getMessage());
        }
    }
    /**
     * 
     * @param RuleInterface $rule
     */
    private function autoGenerateCouponOnSingleRules(RuleInterface $rule)
    {
        $couponSpecData = [
            'rule_id' => $rule->getRuleId(),
            'qty' => 5, // How coupon you want to create 
            'length' => 12, // Coupon length
            'format' => 'alphanum', // Alphanumeric = alphanum, Alphabetical = alpha ,
            'prefix' => 'A', // Can use Null 'prefix' =>  null,
            'suffix' => 'Z', // Can use Null 'prefix' =>  null,
            'dash' => 0, // Can use Null 'prefix' =>  null,
            'quantity' => 5 // How coupon you want to create 
        ];
        
        $couponSpec = $this->generationSpecFactory->create(['data' => $couponSpecData]);
        $this->couponManagementService->generate($couponSpec);
    }  
}

  How to Upgrade magento version from 2.3.x [EE] to 2.3.x [EE] Here are the steps I used to successfully update Magento 2.3.3 [EE] to 2.3.5 ...